

This guide walks you through integrating Sitecore Content Hub with Azure Entra ID using SAML 2.0 for Single Sign-On (SSO).
Sitecore Content Hub is an enterprise platform for managing digital assets, modular content, marketing workflows, and product content in one central location.
Integrating SSO with your identity provider improves security, simplifies user management, and ensures consistent access control across your organization. It reduces reliance on passwords, supports compliance requirements, and helps enforce centralized identity governance.
This guide is designed to help IT teams and platform admins configure SSO step by step, with clear explanations for both what to do and why it matters.
What you're configuring
SAML (Security Assertion Markup Language) is a protocol that allows identity providers (like Azure Entra ID) to authenticate users and pass those credentials to service providers (like Content Hub).
Once configured, your Content Hub users will:
Sign in via their corporate Entra ID credentials
Use the same Entra ID credentials across all systems
No longer manage separate Content Hub passwords
Before you begin
You will need:
Admin access to your Azure Entra ID (formerly Azure AD)
Superuser (admin) access to your Sitecore Content Hub environment
Our Content Hub instance URL*
*Note that we need to repeat these steps for all Content Hub instances – DEV, QA and PROD.
Step 1: Register a new app in Azure Entra ID
We’re creating an identity configuration in Azure that will act as the SAML identity provider (IdP) for Content Hub.
Steps:
1. Go to https://portal.azure.com
2. Open Microsoft Entra ID

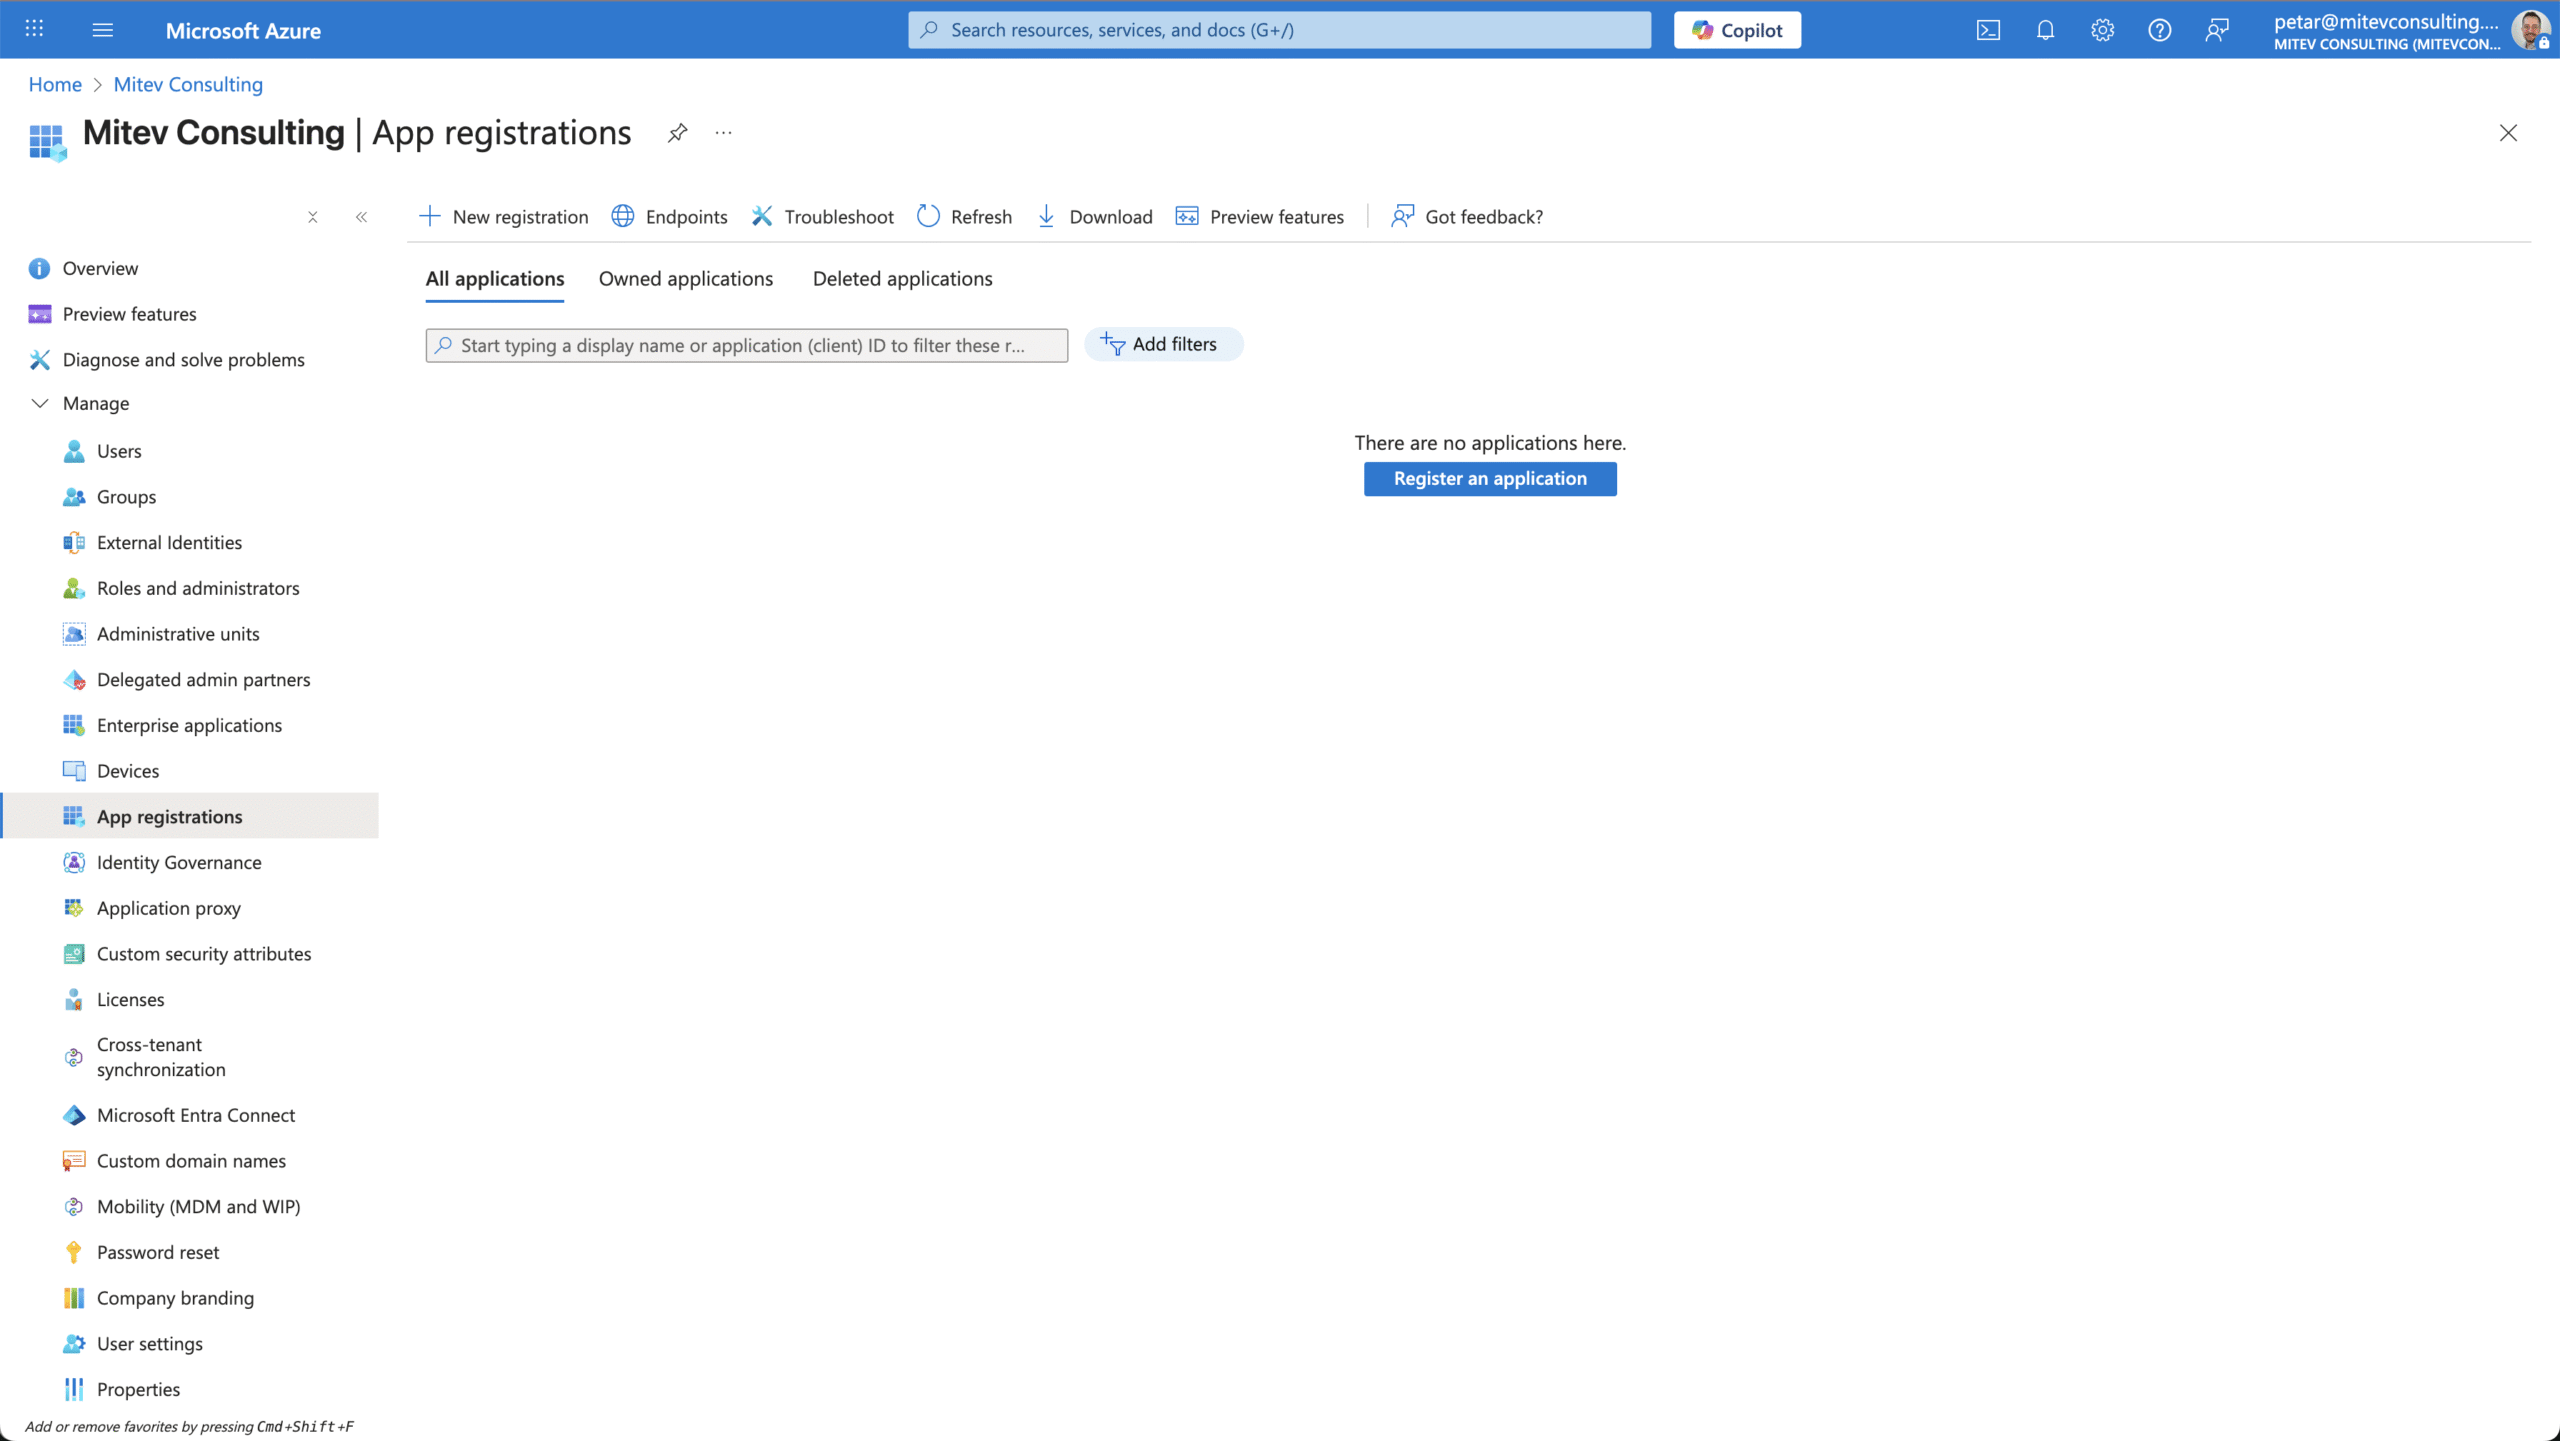
2. Under Manage, select App registrations
3. Click + New registration
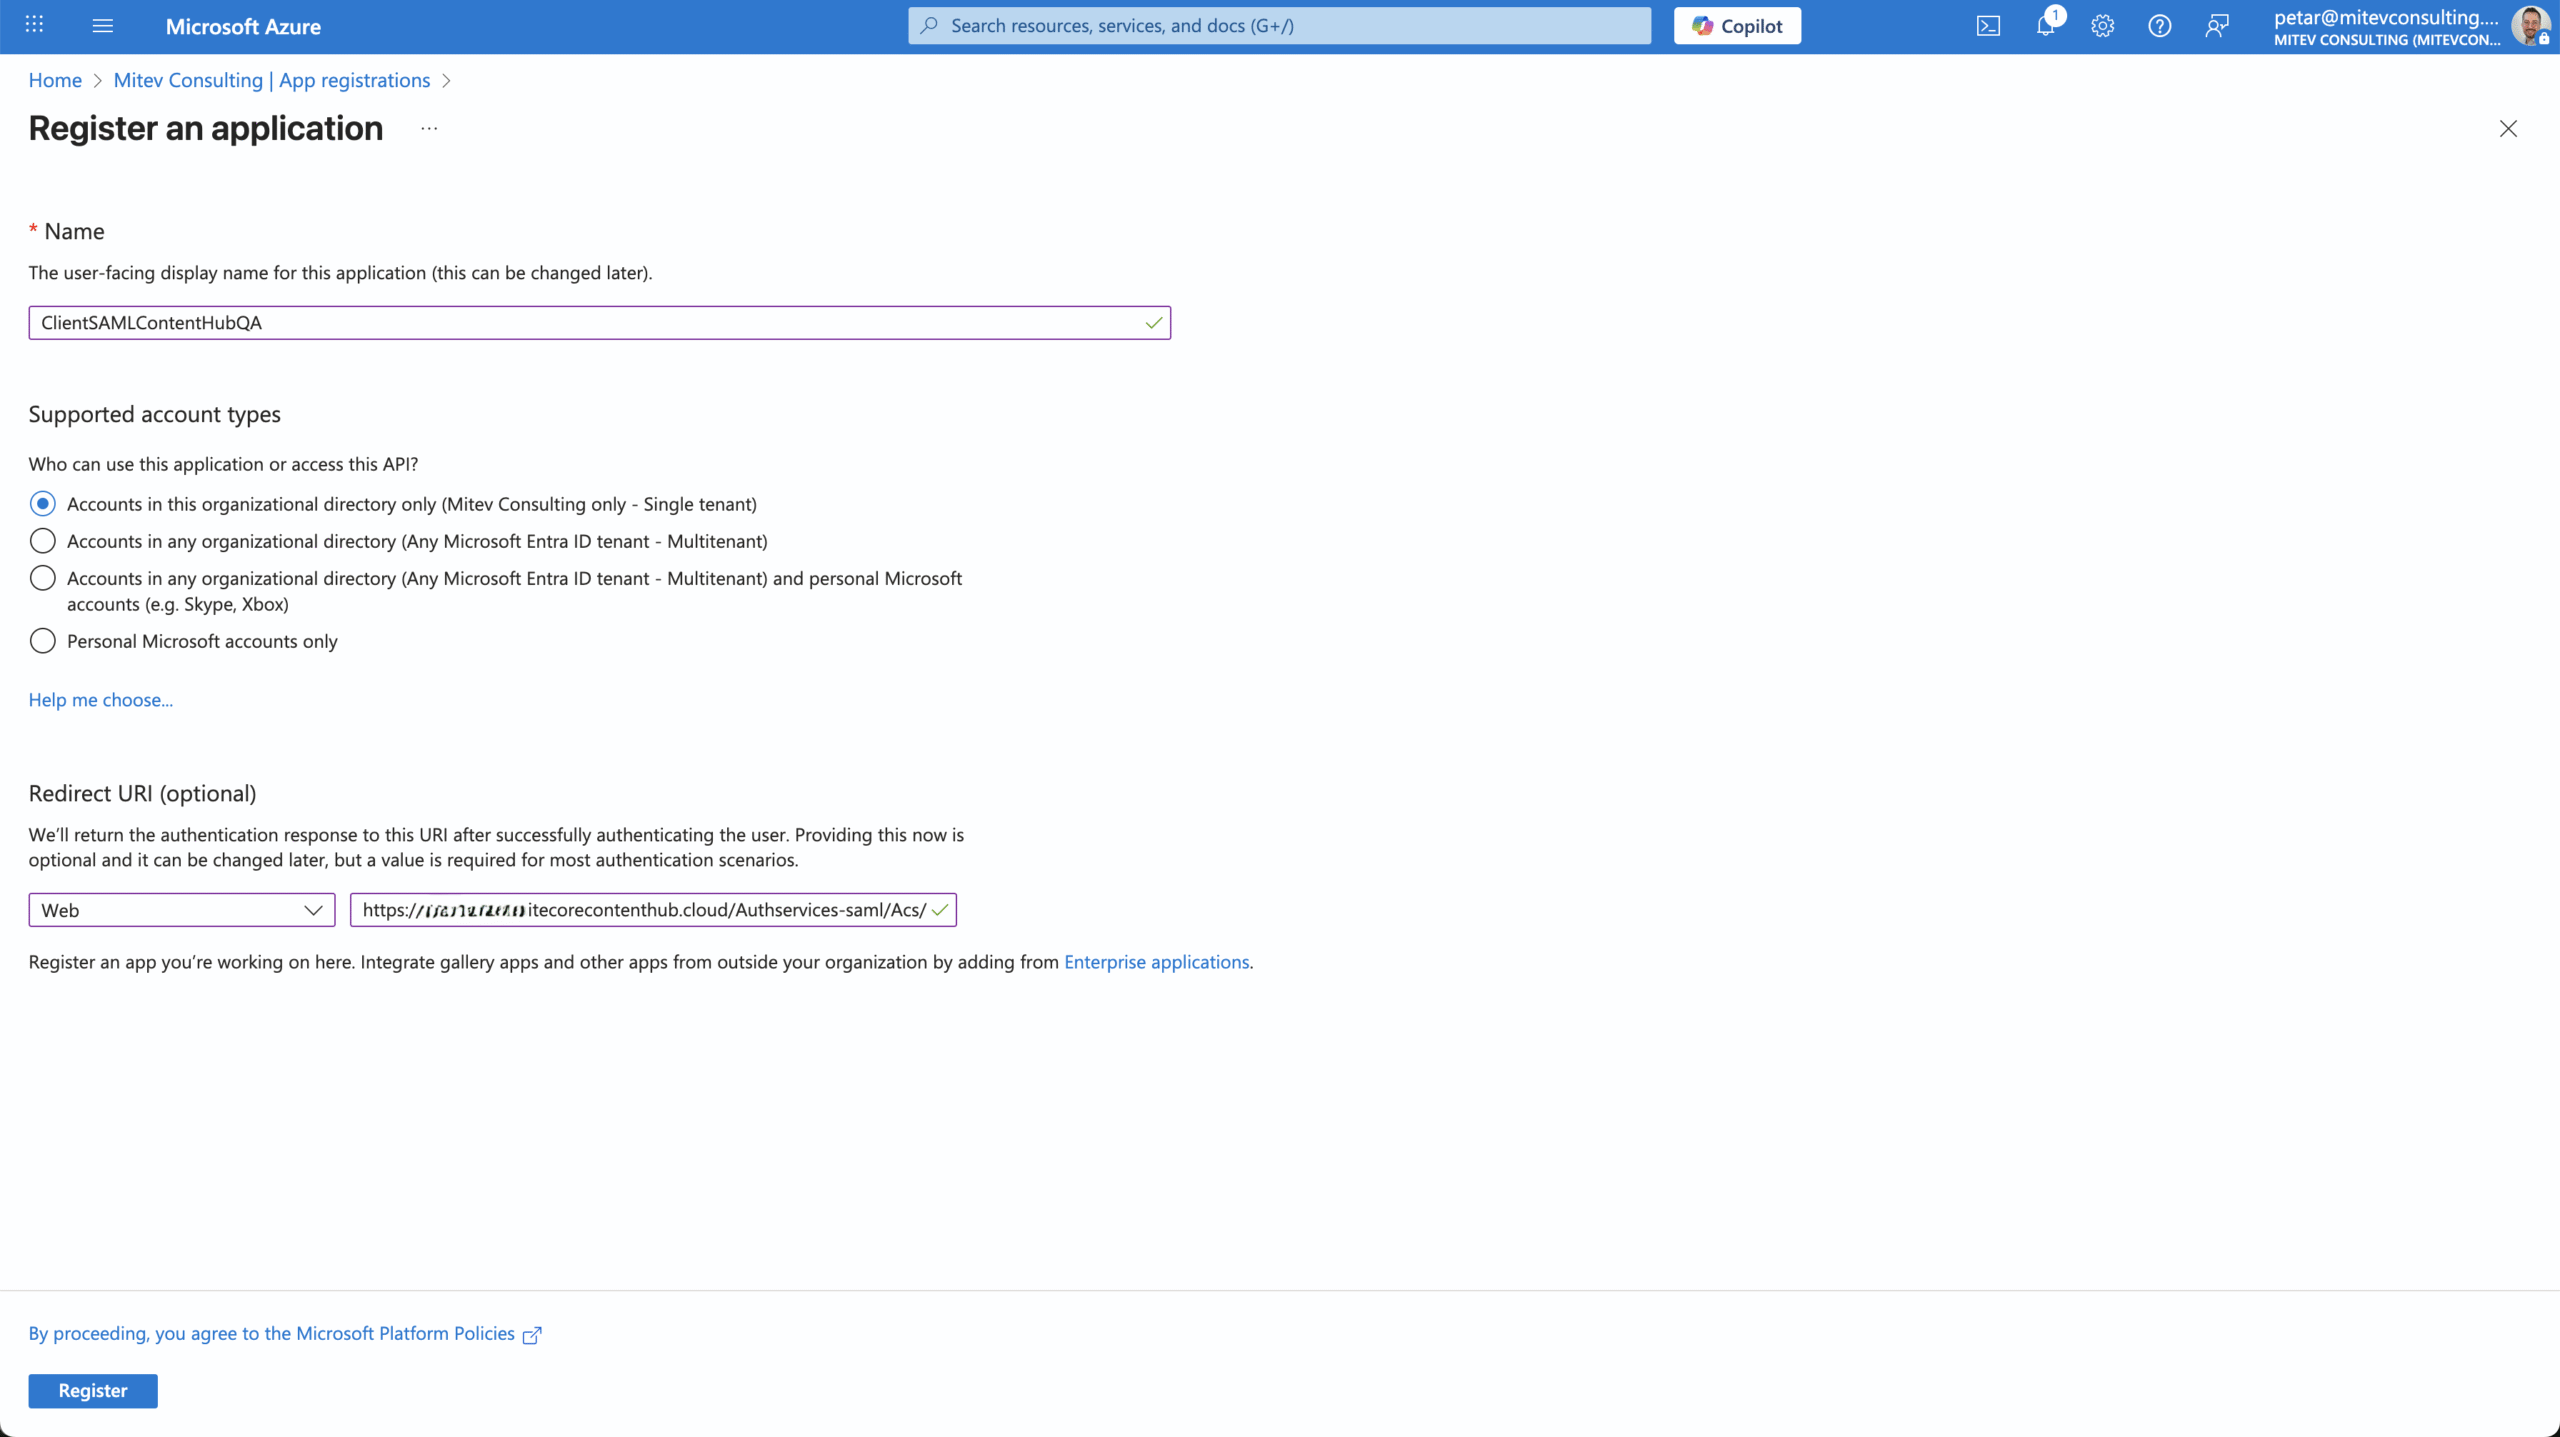
Fill in:
- Name: something clear like CustomerNameSAMLContentHubQA (must be unique for each Content Hub instance URI)
- Redirect URI (Web): use this format:
https://[your-instance-name].sitecorecontenthub.cloud/Authservices-saml/Acs/This tells Azure where to send the SAML response after successful authentication.
Step 2: Configure authentication settings
Content Hub needs to know how to interpret logout events and what kind of tokens Azure should issue.
Steps:
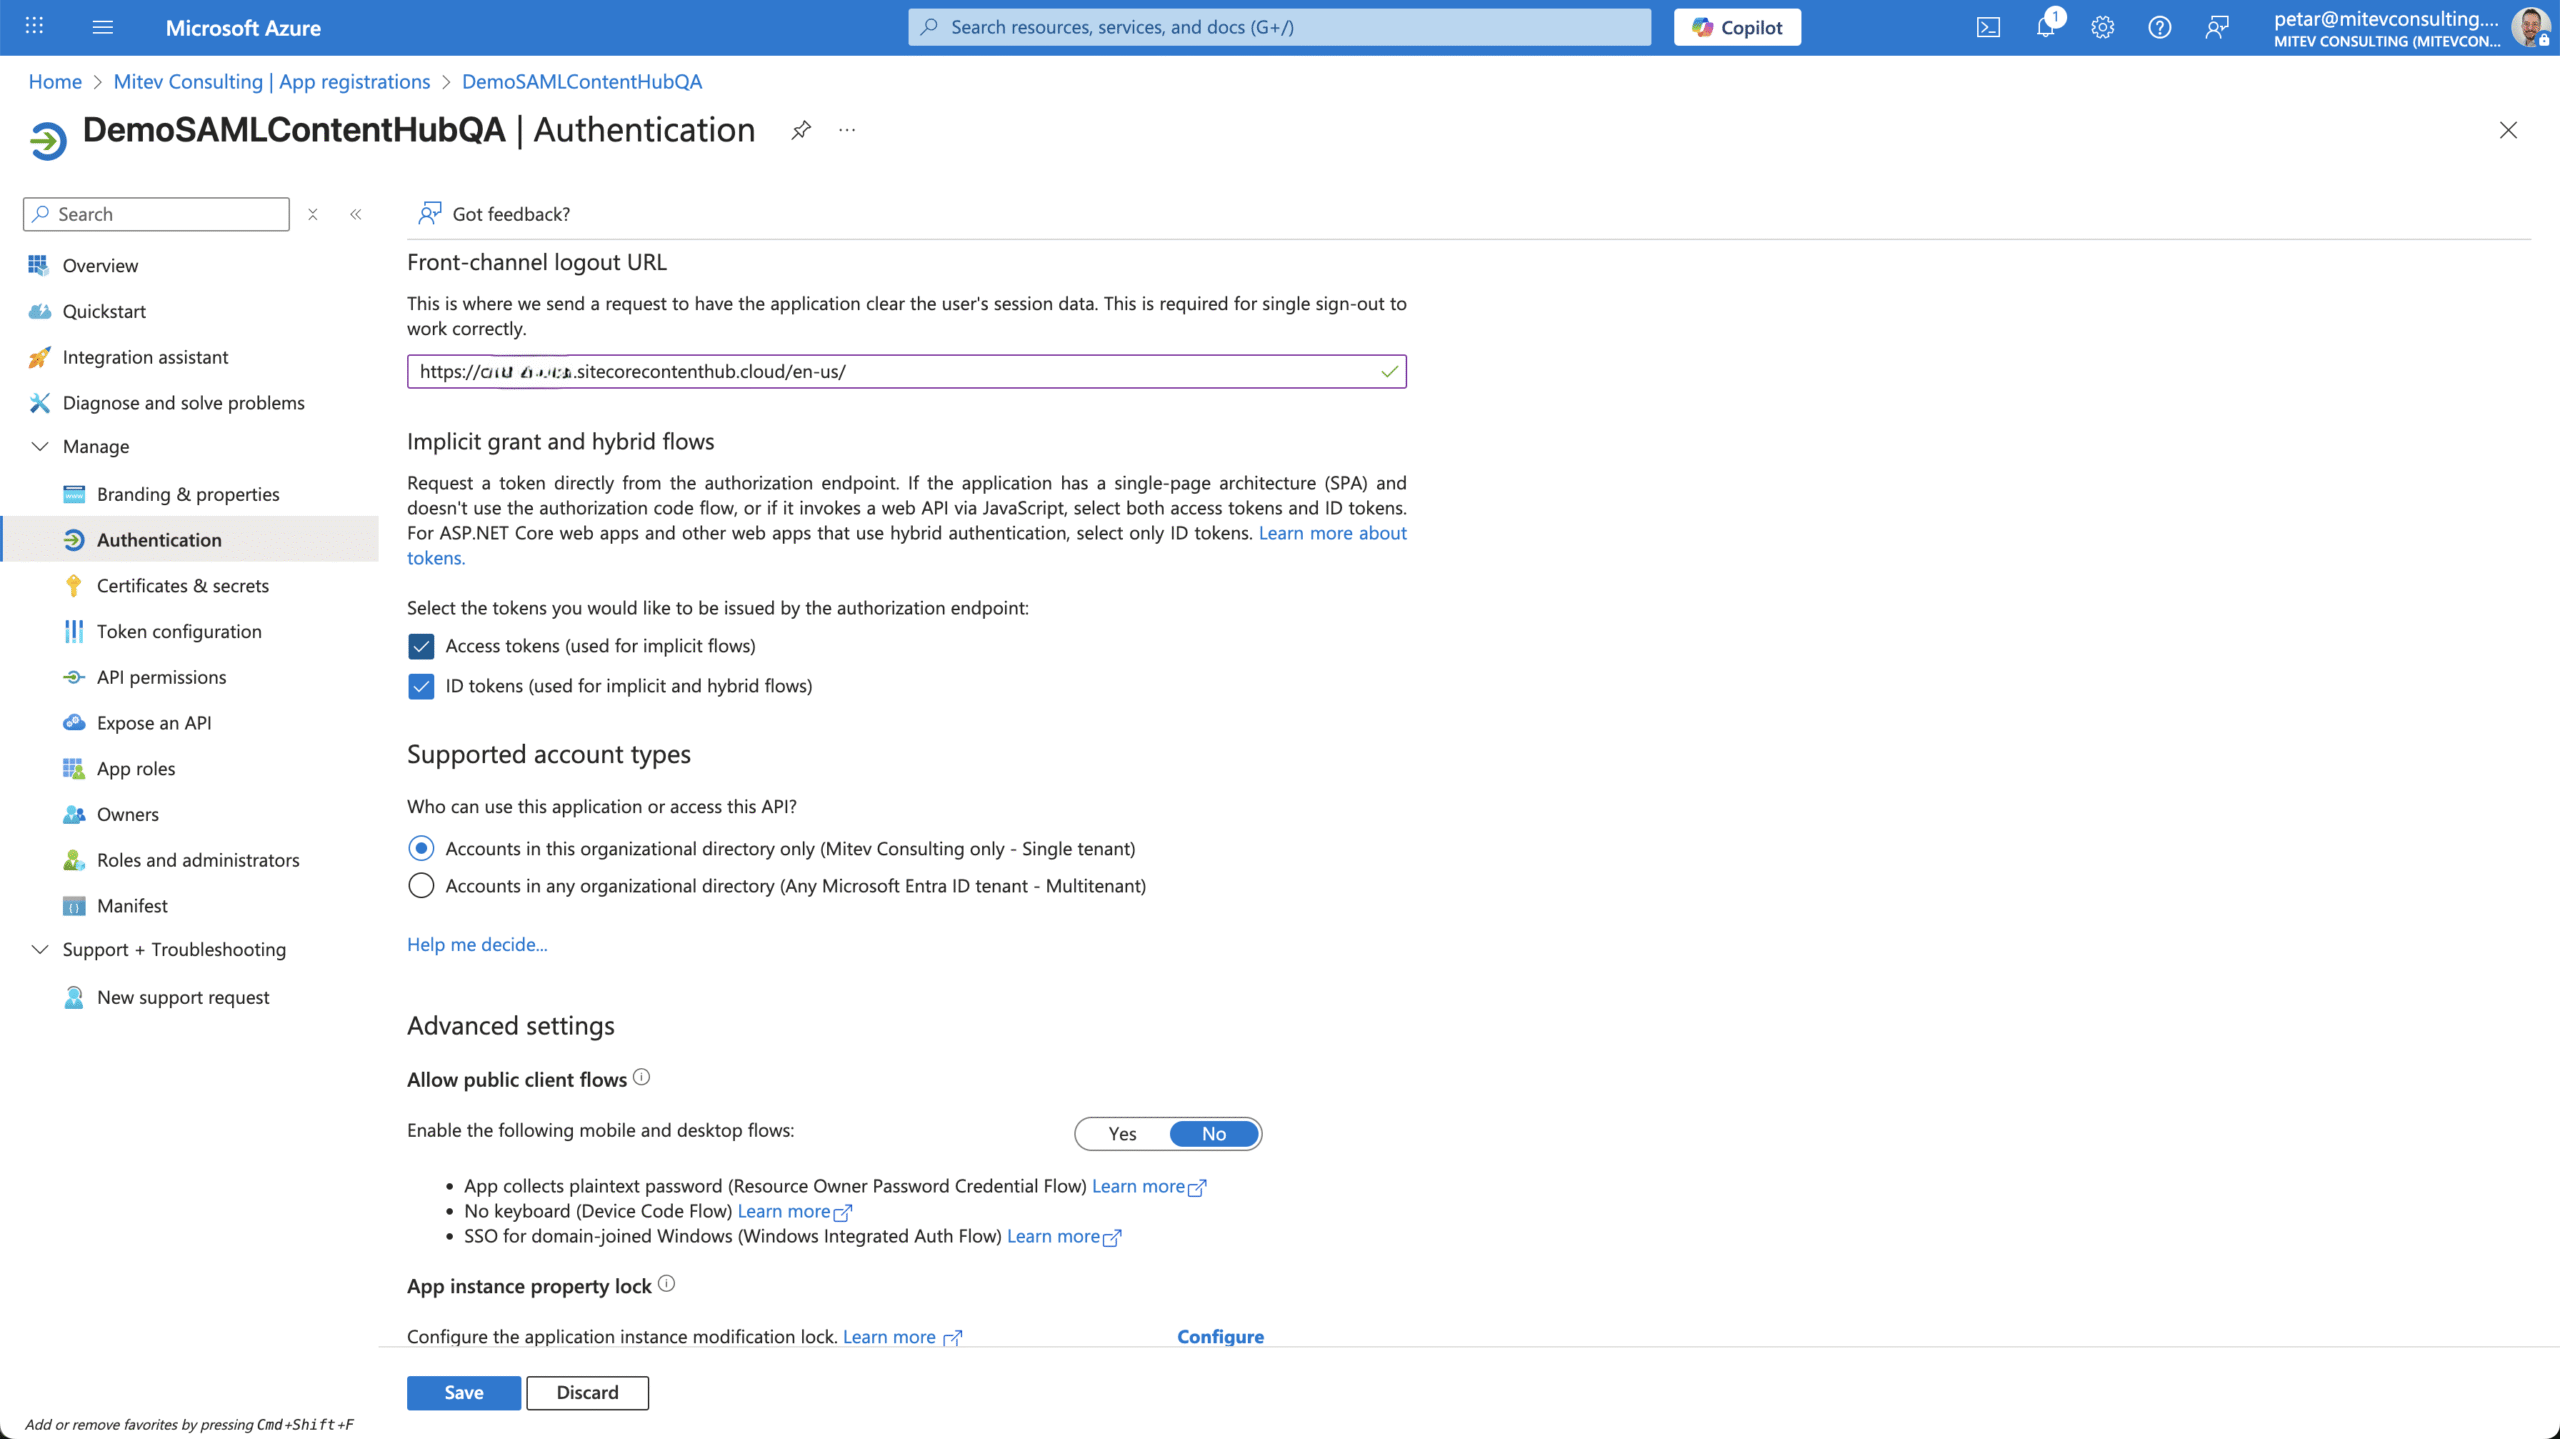
- Go to Manage > Authentication
- Set Front-channel logout URL to:
https://[your-instance-name].sitecorecontenthub.cloud/en-us/- Enable these under “Implicit grant and hybrid flows”:
- ✅ Access tokens
- ✅ ID tokens
These allow token-based sign-in without needing additional prompts.
Step 3: Add email claim to SAML token
We can have Content Hub match users based on email address. This claim must be present in the token Azure sends.
Steps:
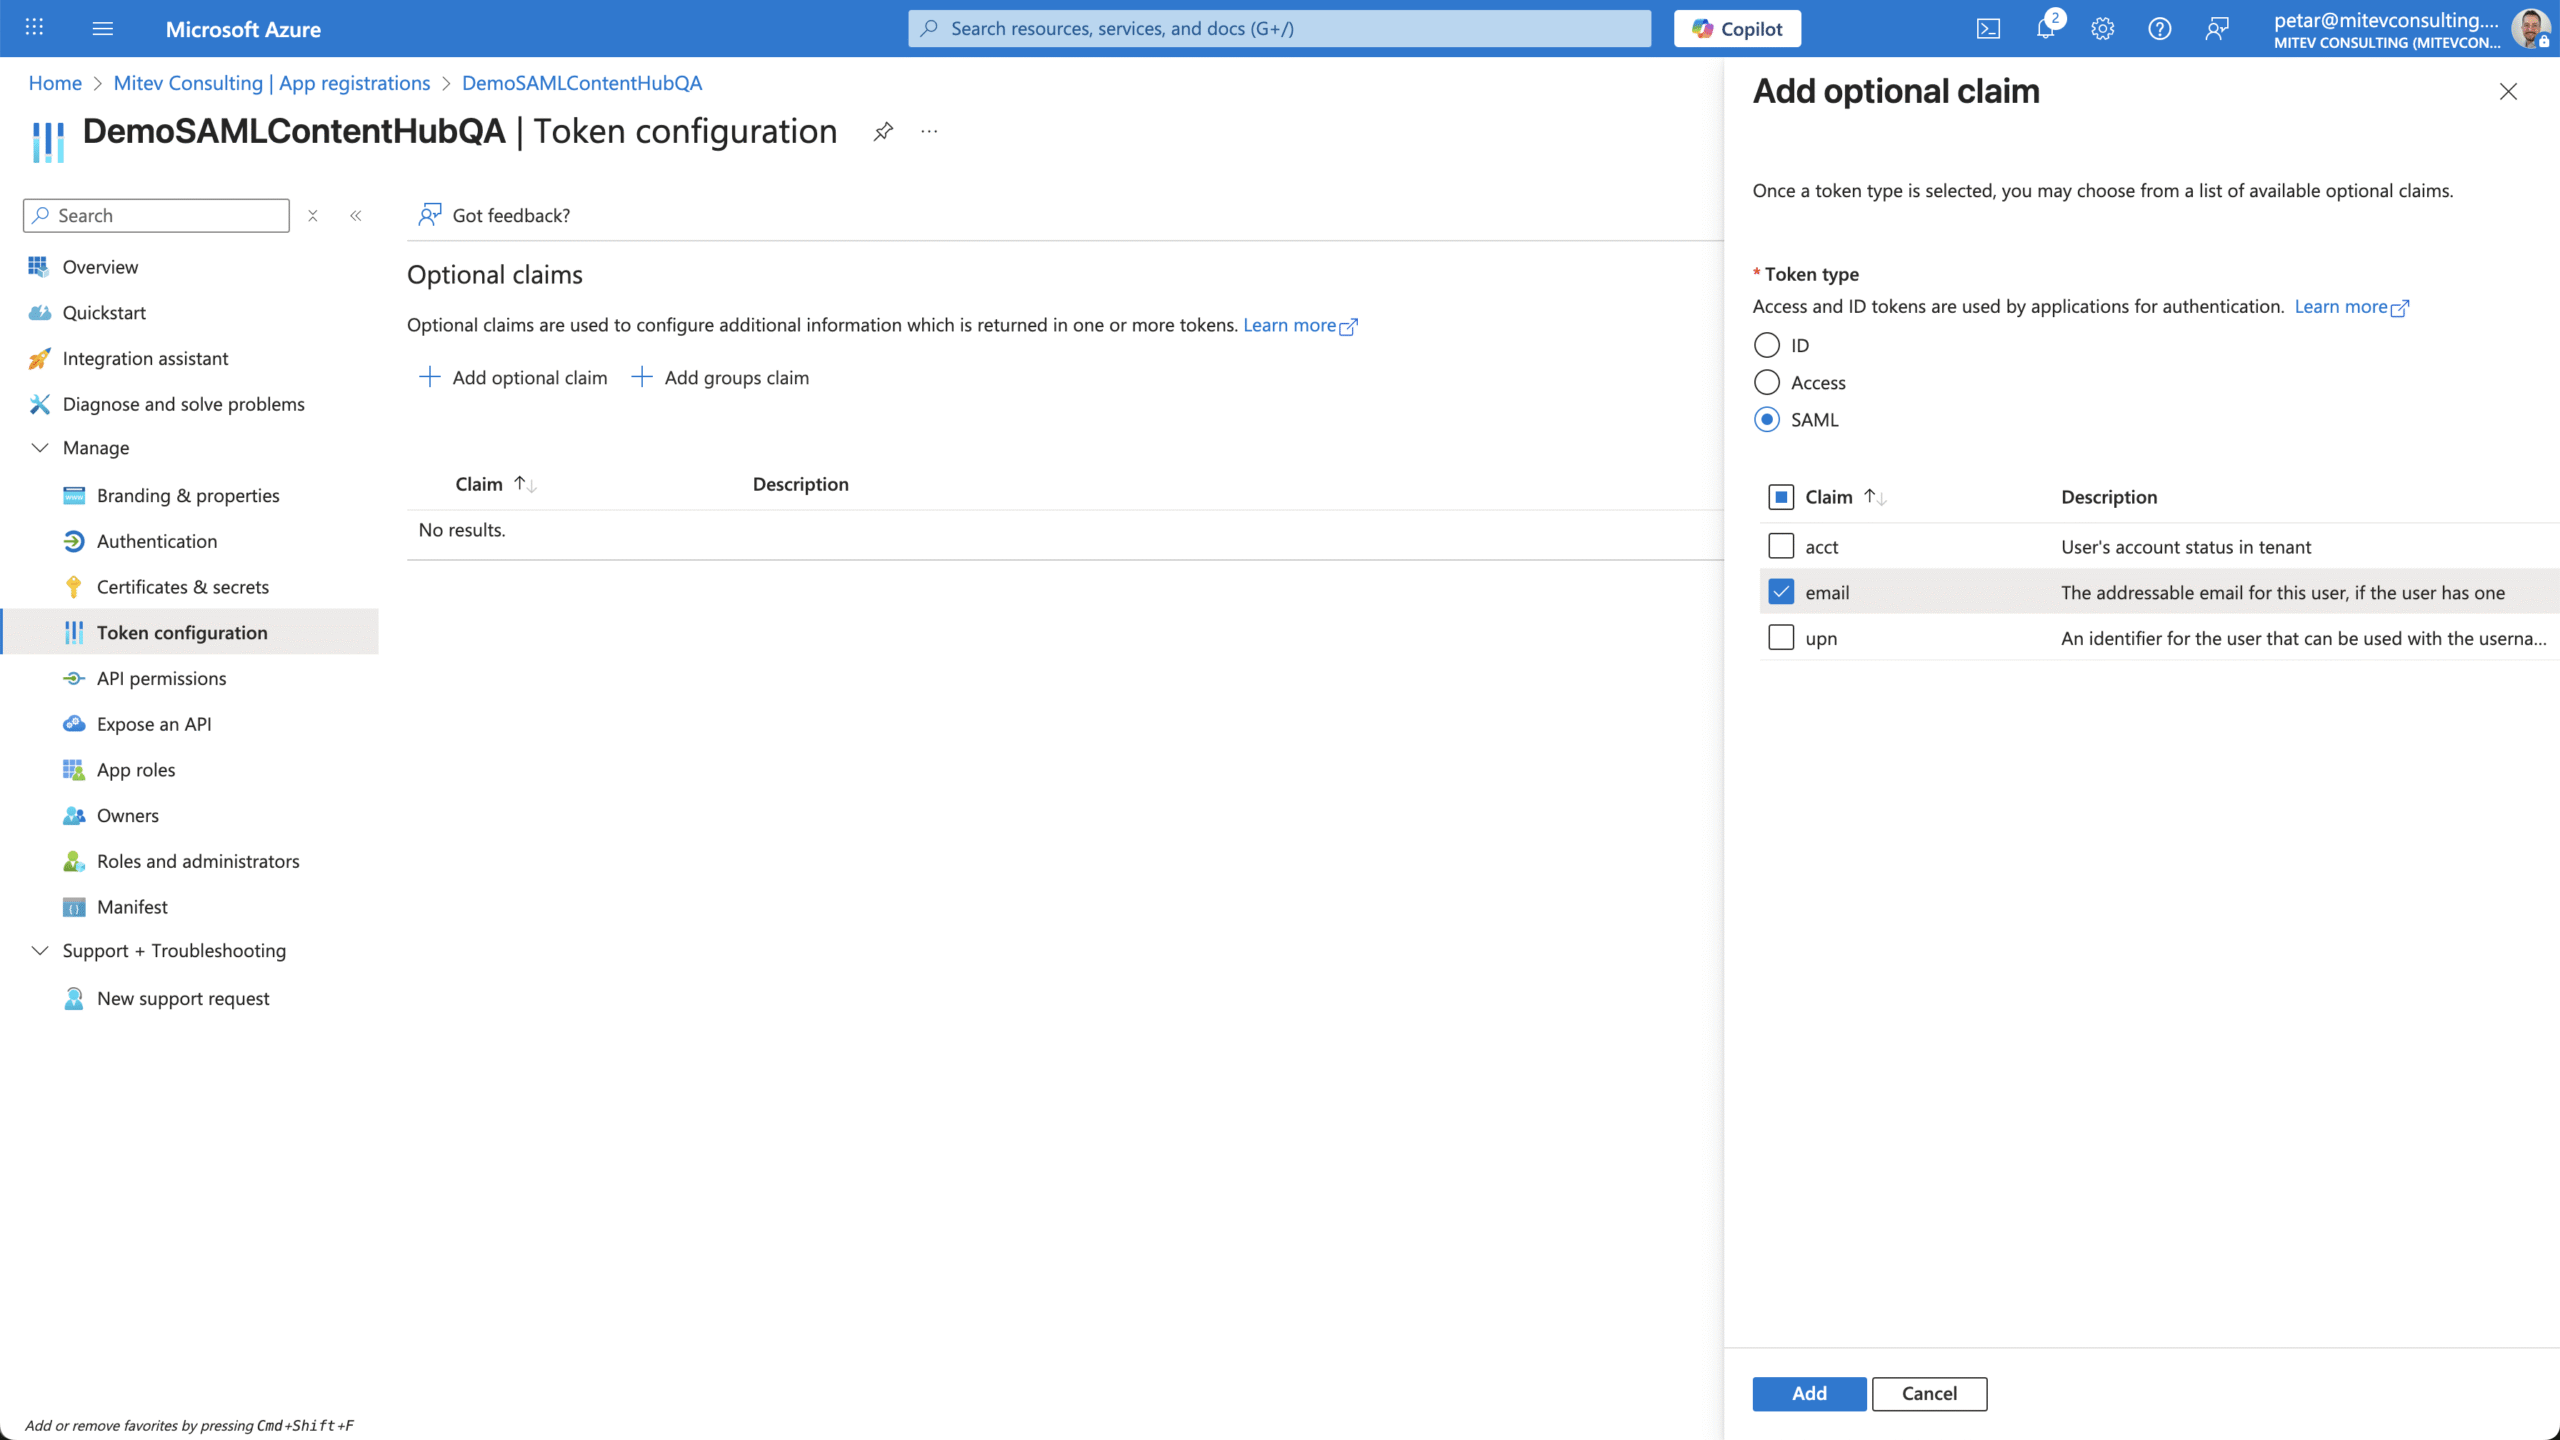
- Go to Manage > Token configuration
- Click + Add optional claim
- Choose:
- Token type: SAML
- Claim: email
- Click Add
(Ignore the prompt to add Graph API permissions — we’ll cover that next)
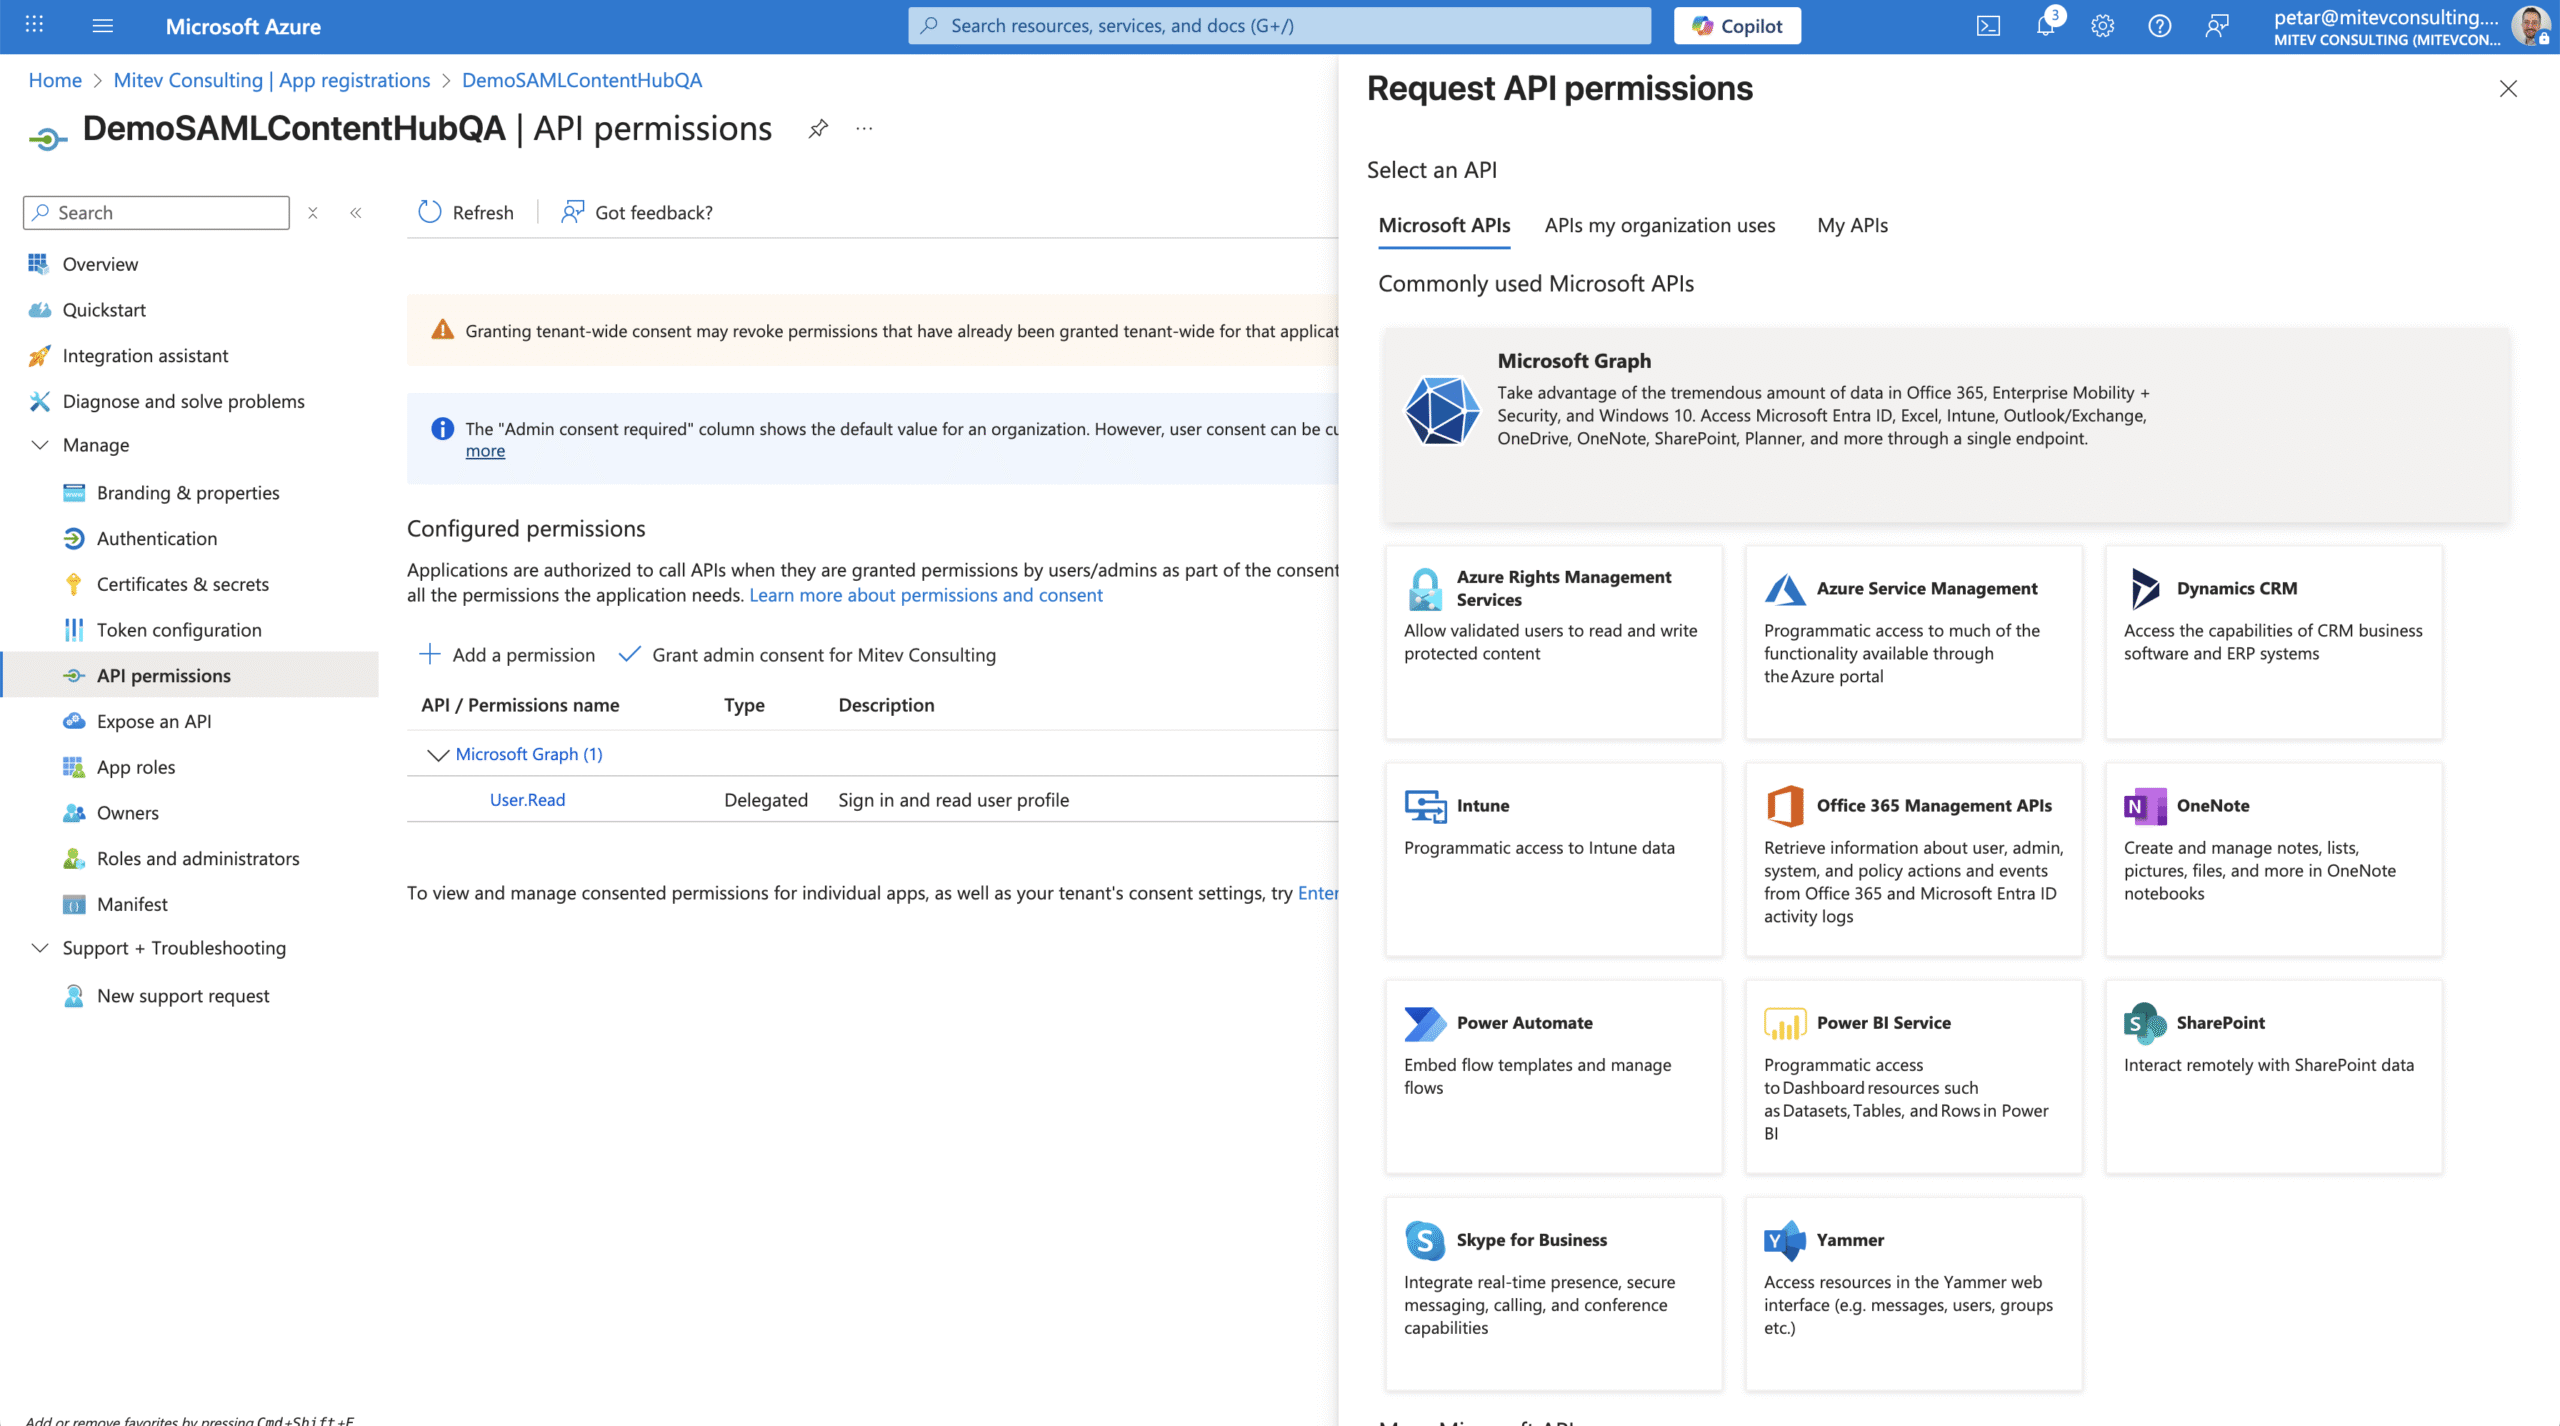
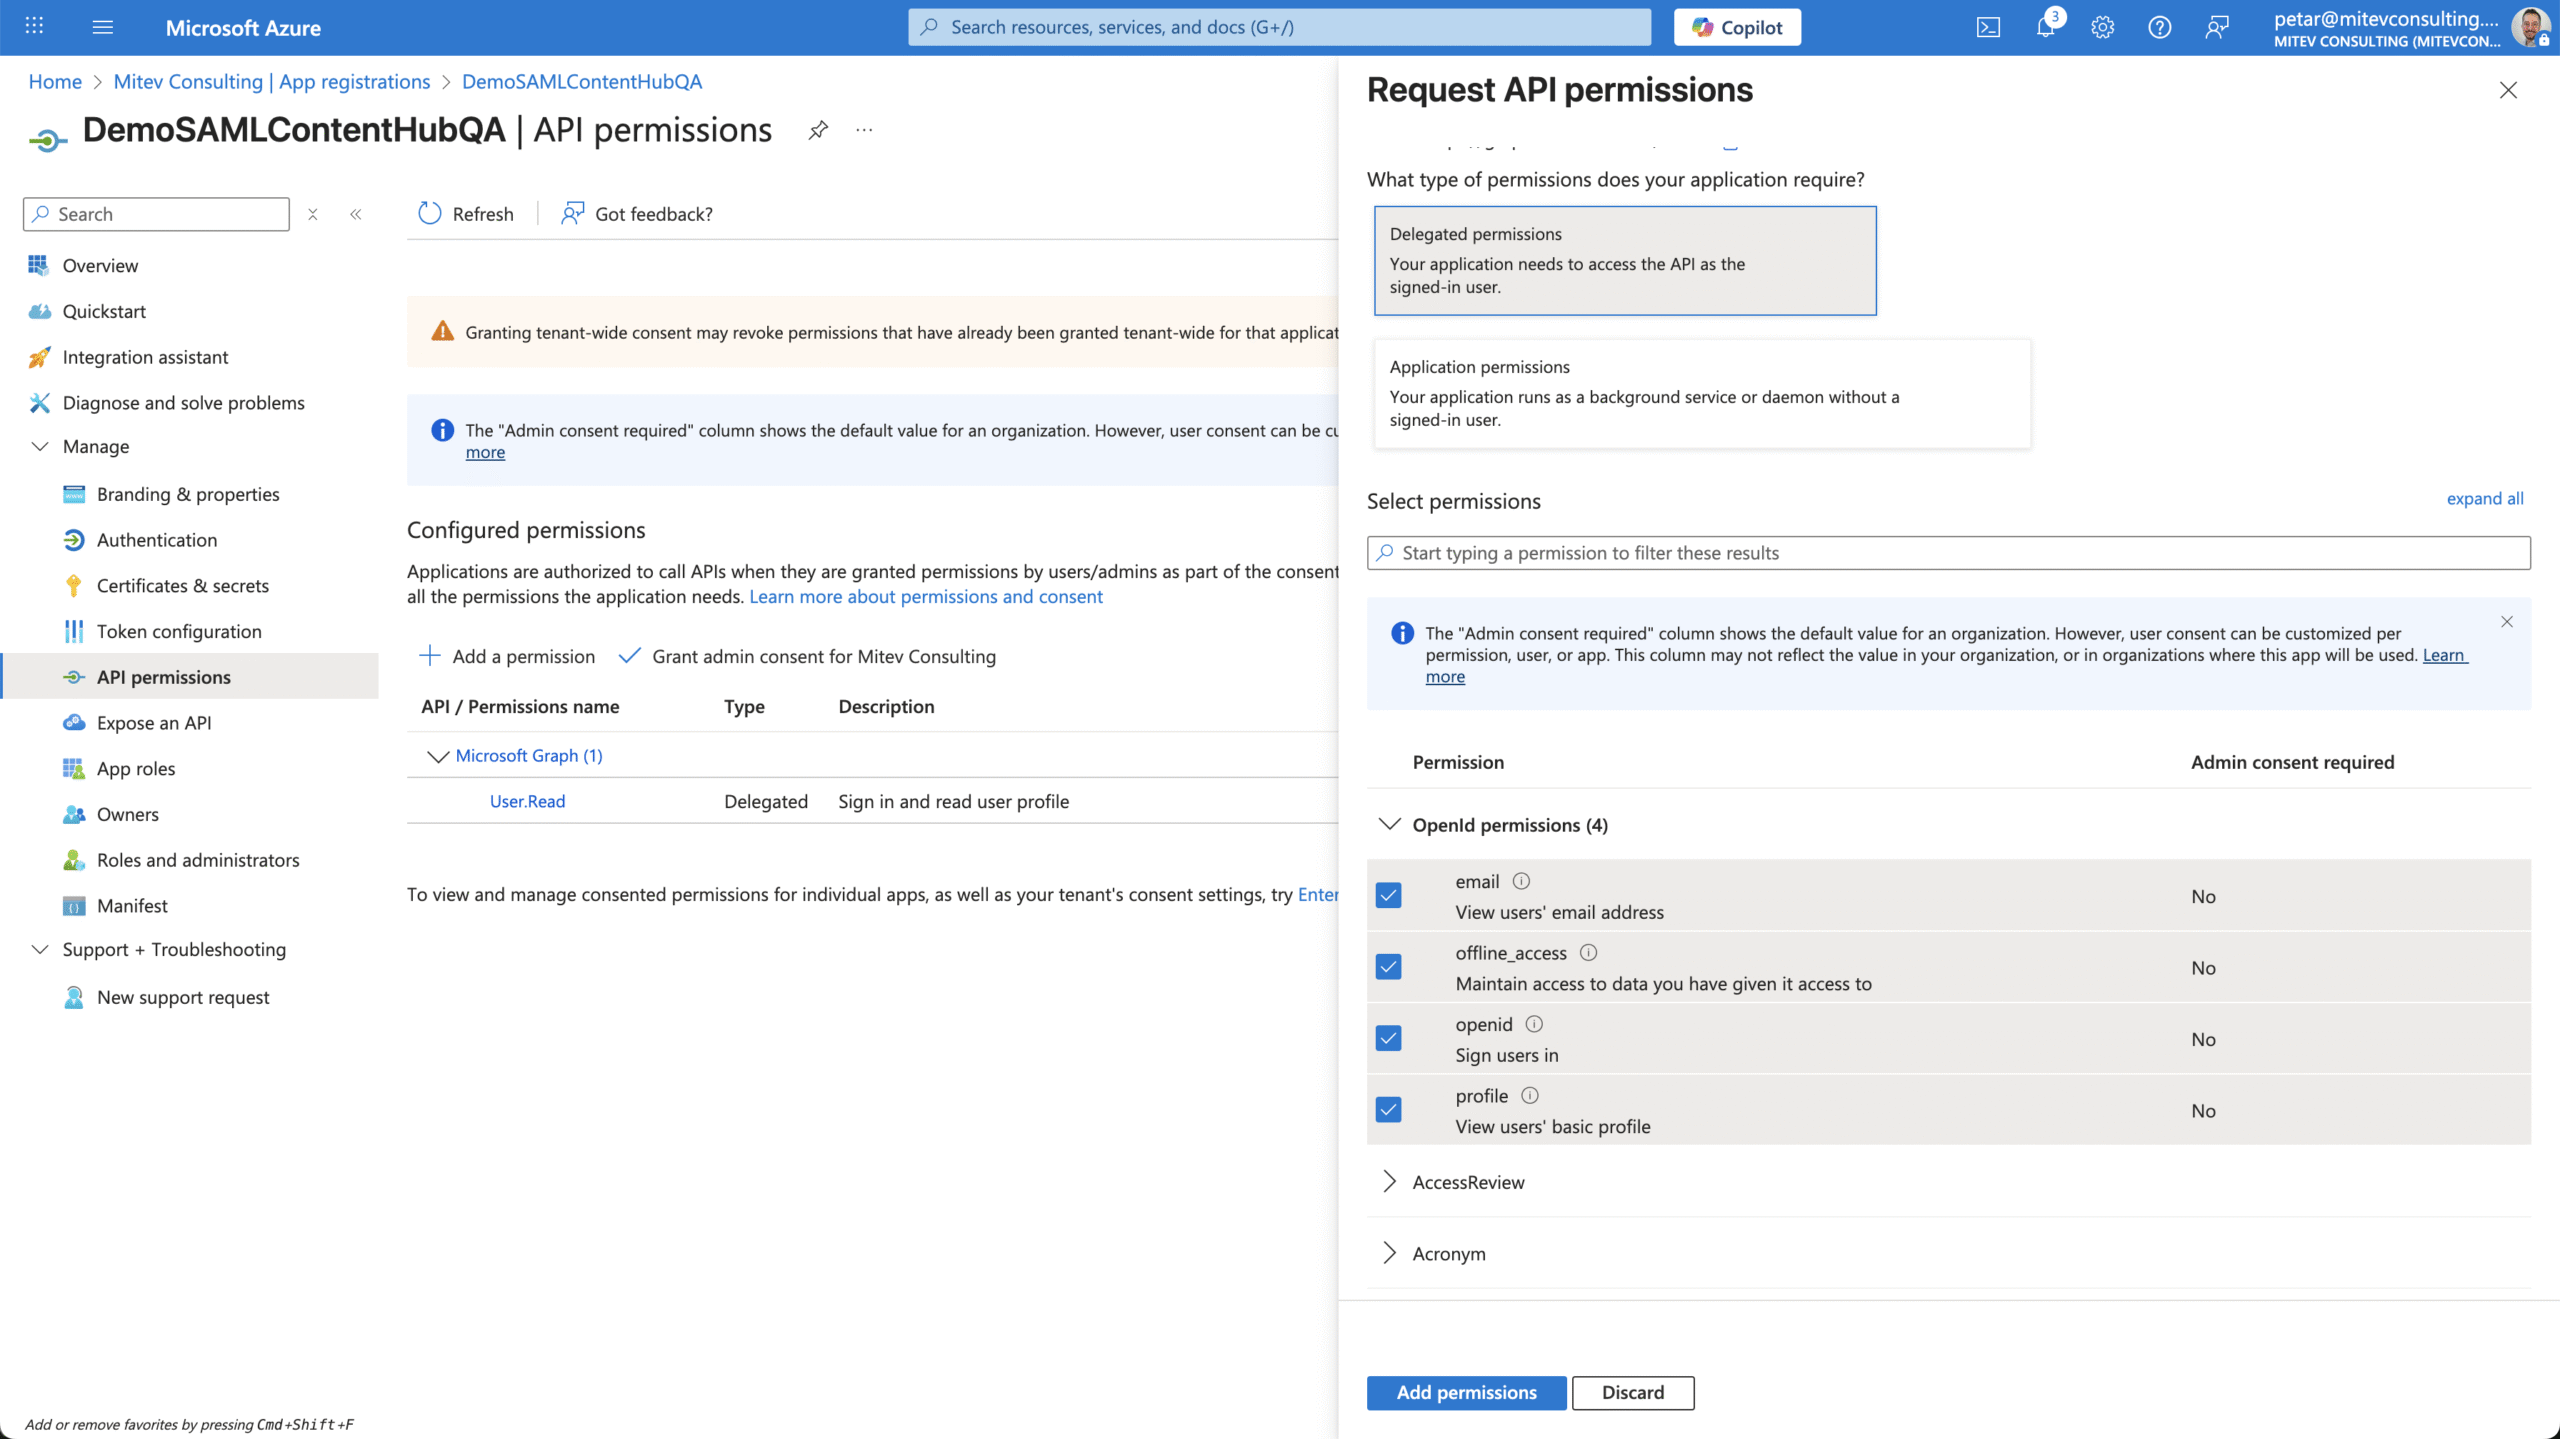
Step 4: Add Microsoft Graph API permissions
Azure requires permission to include certain fields like email, profile, etc., in the SAML token. These are OpenID standard claims.
Steps:
- Go to Manage > API permissions
- Click + Add a permission
- Choose Microsoft Graph > Delegated permissions
- Select:
- offline_access
- openid
- profile
- Click Add permissions
Step 5: Expose the API and retrieve key values
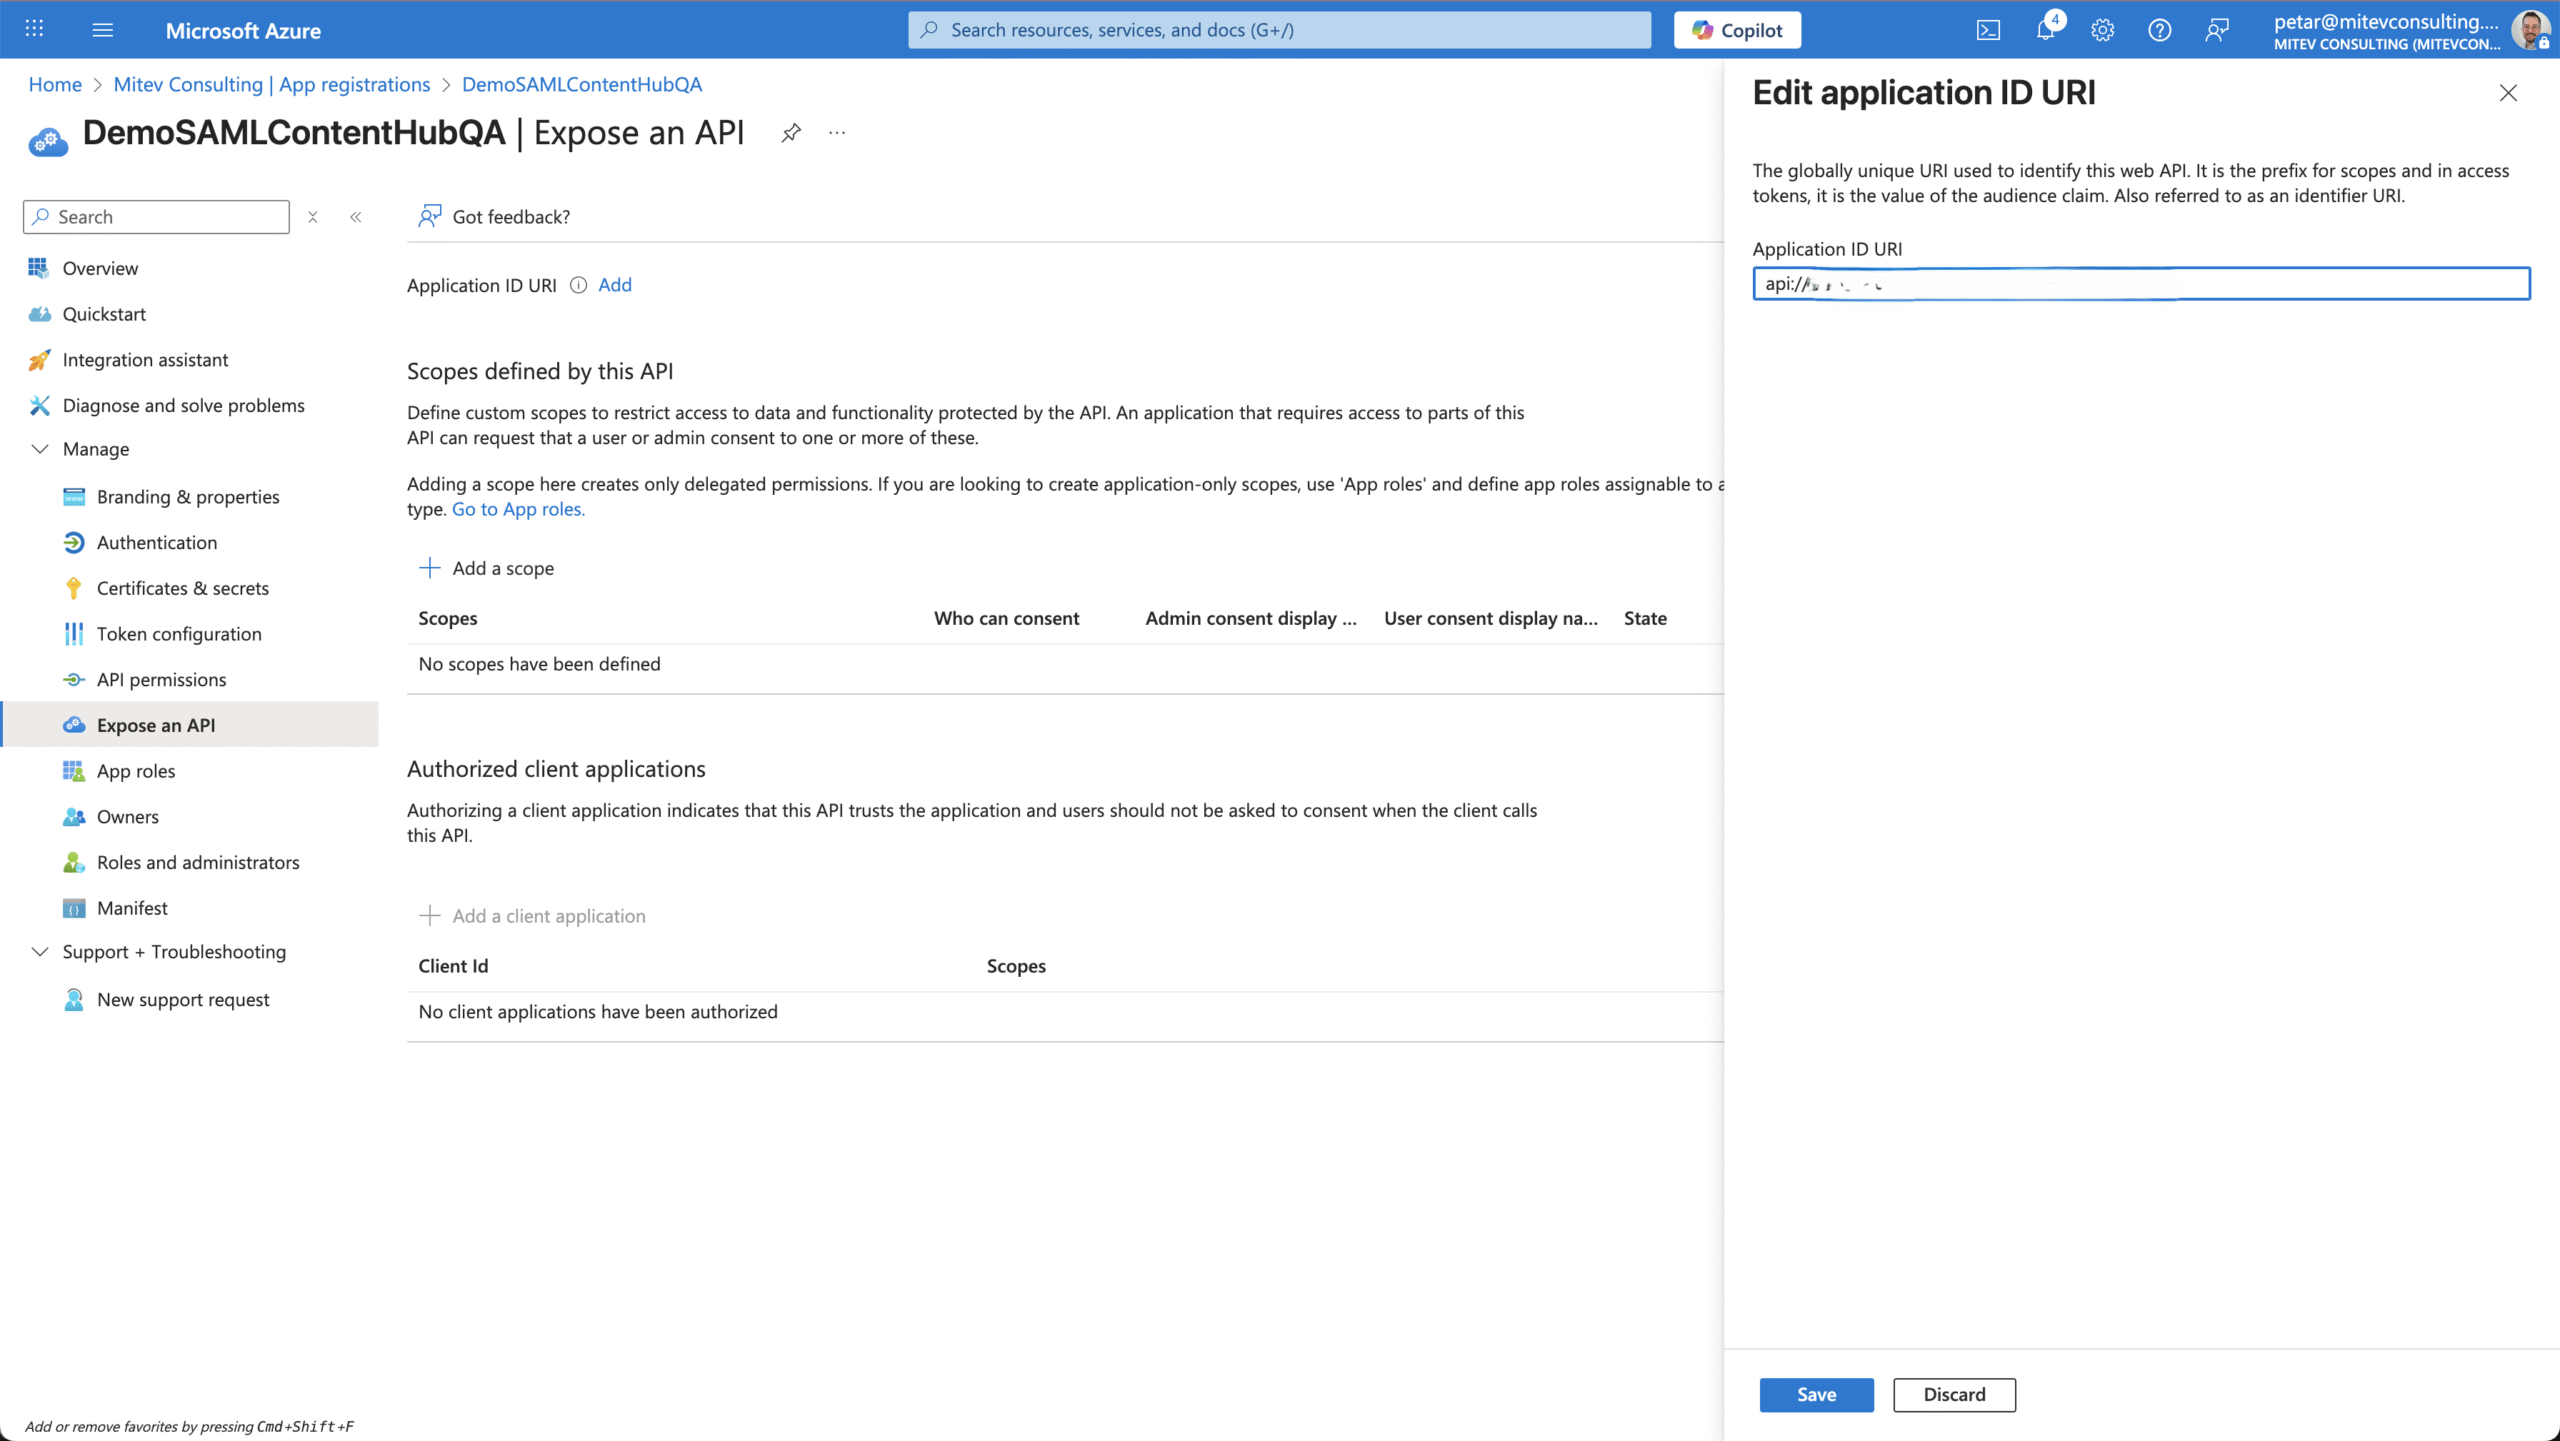
We’ll need to provide Content Hub with Azure’s metadata, application URI, and entity ID so it knows how to trust and communicate with the IdP.
Steps:
- Go to Manage > Expose an API
- Click + Add next to Application ID URI and click Save
- Go to Overview
- Copy and save in your notes:
- Display name
- Application ID URI
- Copy and save in your notes:
- Click Endpoints
- Copy and save in your notes Federation metadata document URL
- Open the Federation metadata document URL in your browser
- Copy and save in your notes the entityID from the XML root
Step 6: Configure SAML setting in Content Hub
Now we are telling Content Hub how to connect to our identity provider and authenticate users using SAML.
Steps:
Build your config using this template:
					"saml": [
  {
    "authentication_mode": "Passive",
    "email_claim_type": "http://schemas.xmlsoap.org/ws/2005/05/identity/claims/emailaddress",
    "username_claim_type": "http://schemas.xmlsoap.org/ws/2005/05/identity/claims/name",
    "idp_entity_id": "[EntityID]",
    "is_enabled": true,
    "metadata_location": "[FederationMetadataDocumentURL]",
    "provider_name": "[DisplayName]",
    "sp_entity_id": "[ApplicationIDURI]",
    "module_path": "AuthServices-saml",
    "password": null,
    "certificate": null,
    "binding": "HttpRedirect",
    "authn_request_protocol_binding": null,
    "messages": {
      "signIn": "Sign in with SSO"
    }
  }
]
Replace:
- [EntityID] — entityID found in the root Federation metadata document XML
- [FederationMetadataDocumentURL] — Federation metadata document XML
- [DisplayName] — Display name
- [ApplicationIDURI] — Application ID URI
- OPTIONAL: we can change the “messages” value pairs if necessary to display a different “Sign in with SSO” button text
Step 7: Apply Authentication setting in Content Hub
Steps:
- In Content Hub, go to Manage > Settings > search for Authentication
- Switch to Text JSON view
- Set (if not previously done yet):
"EnableExternalAuthentication": true- Scroll to ExternalAuthenticationProviders
- Replace the “saml”: [] section with your JSON config from the template above
- Save the setting
Step 8: Test the integration
- Open a private browser window
- Navigate to your Content Hub login screen:
https://[your-instance].sitecorecontenthub.cloud/en-us/ - You should now see a Sign in with SSO button (or whatever text we have added as a sign-in message in the value pairs above)
- Click and verify the login flow works as expected

